


Small Home Gazette, Spring 2010
How to Plan for Tile—in Your Bathroom and Kitchen
Thoughtful planning will make your next bathroom or kitchen tile project—whether a remodel or new—something you will savor for years to come. We believe your experience should be a fun exploration. Here is what we recommend to help you on your way.
Step 1. Creating the Vision
There are thousands of tile designs, colors and concepts for you to choose from, and the process can sometimes be overwhelming. To help create your vision, look at Arts & Crafts related books and magazines; search the Internet for tile sites and images. Your tile designer or showroom dealer may have historic and contemporary books to help with ideas. Assemble clippings of the ideas and color schemes you like.
Step 2. Determine Style
What is the style you want to create in the space? Do you want to work with the period of the home—bungalow or other Arts & Crafts style—or introduce a sympathetic contemporary style? Working in a period will guide your decision process and help narrow your choices.
Do you have eclectic tastes and want to make a piece of art in the space? If so, working with themes and color ranges will help you keep on task.
Step 3. Timelines
Begin planning your bathroom or kitchen tile at the beginning of your remodel, before other things are installed that could limit your tile choices and design. In too many cases, tile selection is left until the end of the project because that is when it is installed. Order time for tile can be anywhere from 2 to 8 weeks. Make sure you have your tile when your tile installer is scheduled.
Step 4. Role of Designer or Architect
Kitchen and bath designers and architects are people who understand space, design and color. They typically charge 15 percent of a project but when you have large or multiple projects, their insights and knowledge can save you more than their fees. These professionals will come to your house and draw up plans for your project(s).
 Step 5. Locations for Tile
Tiles are the easiest surface to keep clean and have a life span of 100 years. When installed correctly, they work well in areas where we use water.
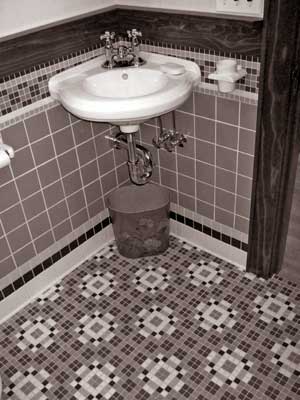
In the bathroom, 70 to 80 percent of a bathroom is often tiled. All shower and shower/tub surrounds should be tiled, to at least 6 inches above the showerhead. Tubs that have a surround but no shower should still be tiled about 6 inches above the top of the tub. In the bathroom sink area, tile the wall behind the sink up to 4 inches above the sink. If the toilet is next to a wall or has walls on both sides, tile all the way around the toilet for easier cleaning and maintenance. And finally, tile the bathroom floor.
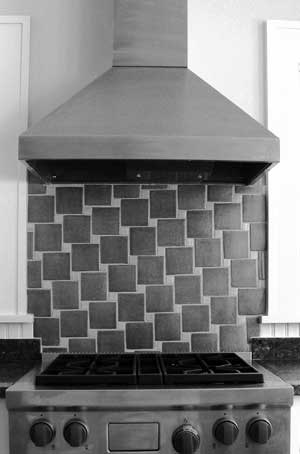 In the kitchen, tile was originally used to protect walls and floors and then also became decorative. At minimum, it is best to have tile behind your sink and cooking areas where water and oils can build up. Many contemporary kitchen floors also are tiled.
You can tile the countertop for either a bathroom vanity or in the kitchen. Tiled countertops, while not as common in the Midwest, have been popular for many years in California and other West Coast states.
Step 6a. Obstacles in the Bath
The bathroom is full of switches and electrical outlets. Switches for lights for the room and the shower stall and for the exhaust fan are often located just inside the door of small bathrooms or closer to their use in large ones. Outlets are generally located next to the vanity, high on the wall. A good location for many of these is above the tile, on the painted wall.
If you are planning to install a shower with multiple showerheads, body sprays or thermostatic controls, there are no standards for where these will be installed. You will need to consult with your plumber as to their locations; then plan your tile design accordingly.
Installing tile on bathroom walls also involves working around the plumbing for toilets and sinks. Some sink faucets may be mounted on walls.
Step 6b. Obstacles in the Kitchen
There are many things that can become obstacles when designing your backsplash. Code requires electrical outlets on the kitchen backsplash every 4 feet. Kitchens generally have many light sources requiring light switches. An alternative for both the electrical outlets and the light switches is an under-cabinet power strip mounted to the bottom and back of the wall cabinets. This will eliminate switch plates on your backsplash.
Your countertop fabricator may recommend using a 4-inch vertical lip of the countertop material in the backsplash area. If you are intending to install a tile backsplash, you can eliminate this lip and butt the tile down to the countertop. This may make your tile design choices easier.
Now think of all the items you keep on your countertop—coffee maker, container to hold cooking utensils, butcher block knife set, cookbooks, toaster—the list goes on. Consider the placement of these when designing your backsplash. If your tile layout includes some decorative tiles, you will want them visible and not hidden by small appliances.
Step 7. Time to Design
Now that you have identified items in your tile space that might restrict your tile design, relocate or remove as many as possible and start playing with the tile. Listen to what they have to say. Your intuition is an integral part of the design process. Contemplate colors and play with new combinations, and let the mood and personality of your home guide your choices. Many tile showrooms as well as tile designers will allow you to check out tile samples at no cost to help you determine colors and sizes.
Step 8. Place Your Order
If you can figure out how much tile you need, that’s great. If a tile setter will be installing the tile, he or she can estimate the amounts and sizes for you. Kitchen and bath designers can also help determine quantities.
One last shopping tip—explore tile showrooms but if you want tile that fits the Arts & Crafts style, consider local or regional tile artists and designers. We have a wealth of talent in our area, many of whom are listed in the Handmade Tile Association annual directory. The 2010 annual directory is available free of charge from their website, www.handmadetileassociation.org. The directory will help you find tile artists and designers for kitchen backsplashes, fireplaces, bathrooms, garden sculptures and more.
Carri Carlson is a kitchen and bath designer who owns Array Kitchen and Bath Design (www.arraykitchenandbath.com) and is an in-house designer at Clay Squared to Infinity. Josh Blanc is a tile artist and designer, and a co-owner of Clay Squared to Infinity (www.claysquared.com), a showroom for handmade tiles and historic reproduction tile lines. Photos courtesy of Clay Squared to Infinity.