


Small Home Gazette, Winter 2013
The Challenges of Installing New Flooring Next to 90-Year-Old Wood
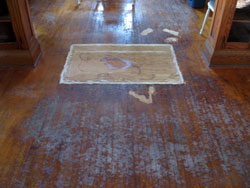
Previously hidden by carpeting, a vent opening had been filled with plywood.
You have a 1922 bungalow with beautiful 1½” white oak floors in the living and dining rooms, but one winter you experience terrible ice dams. Large sections of the floor are damaged beyond repair, and you hire a company to replace the ruined wood with new white oak. But the new patch stands out like a red dress at a funeral. What went wrong?
You have a lovely 1916 home with 2¼” white-looking wood throughout and want to add an appropriate kitchen addition. One contractor thinks you have birch floors and urges you to continue that into the kitchen. Your flooring contractor insists that all early 20th century kitchens were maple. And your brother-in-law thinks you should use an exotic Brazilian walnut because it is the hardest wood available. How do you choose a wood that will perform well in a modern kitchen and still be historically compatible with your existing floors?
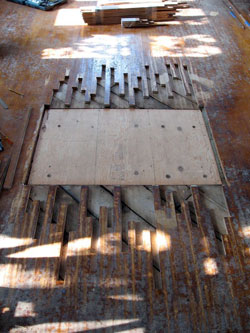
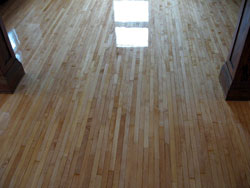
After selectively removing boards to stagger the patch, the area is ready for installation of reclaimed maple flooring.
The 1912 radiators in your upstairs bedrooms have had a few leaks, and the flooring around them is stained and has wide cracks between the boards. Your painter happens to be working in a room nearby and says she can patch out a few of those 1½” boards, use some wood filler in the gaps, and the floor will look like new. Should you believe her?
Floor renovation and repair can be tricky issues for older homes. Wood flooring was designed to be modular and relatively easy to replace and continue, but you don’t want a floor repair or addition to scream its newness from across the room. So, whether you’re doing it yourself or hiring a flooring professional, here are the six attributes of the wood in your flooring that you’ll need to consider.
Species
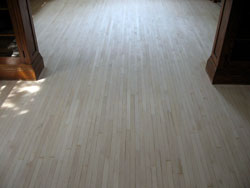
Patch completed and sanded.
If you are patching into an existing floor, make sure the species of your patching wood matches. Even though there were at least six species of wood commonly used for flooring at the beginning of the last century in Minnesota, identifying your wood isn’t easy. Your floor is likely to be red oak, white oak, maple, birch, Douglas fir or pine, and very rarely, beech or cherry (in high end homes). Despite this limited number of woods, we see dozens of mis-matched patches, so don’t guess. Most flooring professionals in our area will be able to identify your floor just by looking at it. If there is some disagreement over which oak you have, there is a chemical test to confirm white oak.
Grade
Patch finished. Difficult to tell difference between reclaimed maple and original maple floor.
When you saw a tree into lumber, the resulting boards vary greatly in appearance. In the 1920s, mills began to use standardized grading rules to separate boards into different categories—based on the number of knots, burls, insect holes, mineral streaks, or heartwood variation present in each board. But even before grading rules became established, the longest and most uniform boards were chosen for the public areas of homes and the busier, more colorful boards were used in bedrooms or in less expensive housing.
Inspect your existing floor carefully and make sure that any wood you buy to match has similar grade characteristics. The grading sequence in descending order (and in descending cost) for modern milled oaks, for example, is: Clear, Select, #1 common and #2 common. (Maple is also graded, but uses a slightly different labelling system. Maple’s highest grade is referred to as #1, followed by #2 and #3.) If you go to Menard’s or any location that stocks oak, they offer the most commonly used grade which is Select. But many homes built between 1890 and 1920 have floors that are exceptionally uniform and probably closer to what would be graded as Clear today. Clear oak will be slightly more expensive but the patch will blend more seamlessly into the existing floor.
Also keep your eyes open for floors that have large numbers of quartersawn or rift-sawn boards. These boards were and continue to be prized for their beautiful ray or fleck appearance. Modern mills have separate grading categories for quartered and rift flooring, so you can purchase boards that have a similar proportion of this character, again for added cost.
For small patches you can hand select boards that offer the best match. To save costs, you could find Clear and even quartersawn in lower grades because all character included in a higher grade are automatically accepted in a lower one.
It is important to remember that grade is not an indication of the quality of the wood, merely a way to define its appearance. The National Oak Manufacturers Association, which controls the grading of American hardwoods, is careful to explain that all grades of hardwood flooring are “equally strong and serviceable in any application” (Official Flooring Grading Rules, National Oak Manufacturers Association, 1997). So, for example, if your maple floor is full of small knots and color variations, you are not sacrificing quality when you choose a #2 maple to better match its appearance.
Milling
 Mills also began to standardize the tongue and groove profile, face width, and thickness of hardwood flooring in the 1920s. Wood flooring from about 1925 forward is reliably ¾” thick, and the most common widths are 1½”, 2¼” and 3¼”, plus 3⅛” for fir. If your home was built before 1920, there is an increased chance that your wood does not match these standardized sizes, so measure your boards precisely before you purchase anything to patch into it. I’ve seen odd board widths like 1¼” and 2½” cause carpenters to cry because it is difficult to locate replacement boards in those sizes, either reclaimed or new. Beware of Douglas fir in particular. It was milled 3¼” wide for a long time before it was standardized at 3⅛”.
There is one final historical milling quirk to keep in mind. For a short time between 1900 and 1920, a great deal of 3/8″-thick flooring was installed in the Twin Cities. But the face width is a deceivingly standard 1½” wide, so it can be easy to assume that you have regular ¾”-thick flooring. Don’t assume! If you are trying to patch an older home with 1½” floors, find a way to check the floor thickness before you purchase your replacement lumber. If you are trying to add a wood floor next to an existing 3/8″, you may be tempted to simply match that 3/8″” floor. But those 3/8″ floors don’t have the shelf-life of a ¾” solid hardwood floor (3/8″ thick floors were clearly invented before electric floor sanders that can remove 1/16″ of wood in one refinishing). You will get more for your flooring dollar if you find a way to keep the adjacent subfloor slightly lower so that you can install a full ¾” floor that still ends up flush with the existing 3/8″ floor.
No matter what the age of your floor—even if it is relatively young and originally matched the milling profile of the wood you’ve purchased to match—patching will be difficult and time consuming. Over time, the shape of the wood in your floor changes. The boards swell and shrink through the seasons and slowly conform to each other. No two boards will be the same shape, let alone the shape they were originally milled to. Even wood from a different room in the same home can be challenging to fit. This is not a defect of the old or even of the new wood, just a fact of aging. So, be prepared to pay your flooring professional well for the painstaking process of making your floor whole again.
Gaposis
Older wood floors have experienced many cycles of seasonal movement, so there are often small, permanent gaps between floorboards. When a repair has to be made in these gappy floors, proper installation practice is to snug up the replacement boards to each other but this will make the repair look obvious. Sometimes introducing a narrow, removable spacer between the patching boards (dimes or washers) can help to make the patch blend better into the older, gappy floor.
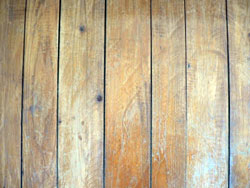
Honest gaps are far more attractive than dirty, poorly filled gaps.
Can I use wood filler to fill the gaps in my floor? We don’t recommend it. The wood fillers that are designed to harden and to be sanded flush with the floor are not very elastic, and tend to crack and fall out in the space of a season. The soft fillers stay soft and tend to pull out with use. An open, honest gap is better than a gap filled with crumbly fill. If the gap is very wide, consider using a “Dutchman,” which is a tapered shim that is pounded into the gap, nipped or sawn off, and sanded level. It fills the gap with wood that will shrink and swell harmoniously with the surrounding boards—or at least more harmoniously than filler.
Board Length
The average length of the floorboards in historic homes is much longer than what is available today. We routinely see 12- and 14-foot boards, even in modest homes from the 1920s. Unfortunately, modern mills don’t cut boards over 8½’ long, and the cost to mill and ship long, custom lengths is prohibitive. If you are trying to match wood in an addition that is adjacent to a floor with those lovely, long boards, Clear grade wood (or #1 for hard maple/birch/beech) will provide the longest average board length. You can select the longest boards in each bundle and place them in the most visible areas to maximize and match the long-board look of the older room.
Color
Color is the most delicate problem of all because, even under the best of circumstances, wood is a natural product and it doesn’t come in fixed, controllable colors. There can be enormous variation from board to board, even if they are milled at the same time from the same tree. So remove the words “perfect color match” from your expectations. That said, here are some tips that will at least improve compatibility.
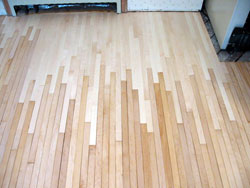
After one coat of finish, it is easy to see how new maple does not match the old.
Most woods darken as they age. Fir, maple and white oak experience the most dramatic color change over time, so it is worth the effort to patch those woods with boards stolen from a closet in the same property or, at the very least, same-species wood of a similar vintage. But be especially careful with maple. Even though the tendency is for older maple to darken, occasionally we see old maple sand up as white as milk, so test-sand a section of your maple before choosing patching wood. If you can’t locate old maple, modern maple flooring is sold in two tones: you can choose between white maple (which is dried at lower temperatures and stays very pale) or caramel maple (which is dried at higher temperatures, caramelizing the natural sugars in the maple and leaving it slightly tan).
-
The redness of red oak is affected by the climate in which it grew. Red oak grown in the south is noticeably redder than northern grown oak. Pre-1935 homes in the Twin Cities are better matched by a northern red oak, but houses from the 1940s and ’50s mostly have very pink, southern oak. Again, sand a small section of the floor close to the area that needs patching and assess the color of your wood before you or your flooring professional buy any patching material. Wood flooring distributors are careful to distinguish their northern and southern mills for just this reason.
-
Finally, don’t expect to be able to patch and blend just one section of a larger floor without sanding and recoating the patch and all the wood in the room it is patched into. It is difficult enough to match the age, size and patina of the lumber itself, let alone trying to re-create the look of an older finish.
Kadee Macey is the owner of the St. Paul hardwood flooring equipment rental and contracting firm, Pete’s Hardwood Floors. Photo of gaps between boards courtesy of Pete’s Hardwood Floors. www.peteshardwoodfloors.com
Other photos courtesy of Tom Marzolf, Golden Rule Home Services. www.goldenrulehomeservices.com
The table below, “Hardwood Floor Grading Rules,” describes the difference between various qualities of available wood flooring.
Hardwood Floor Grading Rules
| Red or White Oak Grades |
Appearance Characteristics Allowed |
|
Clear |
3/8″ bright sapwood entire length of strip, small burls and fine pin worm holes and equivalent character such as small tight checks; in absence of these, one thin brown streak 3″ long to be allowed every 6′. Average board length: 3¾’ |
|
Select |
All above plus unlimited sound sapwood, slight imperfections in milling, reasonable amount of slightly open checks. Brown streaks should not extend the entire length of a piece. Small amounts of torn grain in face work are permitted. |
|
#1 Common |
As above plus readily fillable checks and open knots under ½” in diameter, flag worm holes, sticker stain, heavy streaks and prominent variations in coloration. Average board length: 2¾’ |
|
#2 Common |
Will admit any figure or natural variations of the forest product except shattered or rotten ends, large broken knots, excessive bad millwork or advanced rot. Average board length: 2¼’ |
|
Hard Maple Grades |
Appearance Characteristics Allowed |
|
#1 |
An occasional small, firm pin knot, not over 1/8″ in diameter, occasional green or black spots or streaks not over ¼” wide and 3″ long, tight check not over ½” long provided it is boxed within the piece, bird’s eyes and small burls and slightly torn grain which can be readily removed by ordinary floor sanding. |
|
#2 |
All above plus distinct color variations, sticker stain, numerous green or black spots or streaks, provided they do not occur in combination with predominantly dark heartwood, slight checks not exceeding 3″ in length, dark spots or streaks with slight checks in center and small amounts of torn grain which cannot be removed by sanding. Average board length: 2¾’ |
|
#3 |
May contain all the defects common to maple except knot holes over 3/8″ diameter, unsound knots, voids on ends or edges, shake, heart checks or badly split ends. Average board length: 2¼’ |