Small Home Gazette, Spring 2016
Plumbing Predicament
Editor note: All of us who live in vintage houses eventually encounter a plumbing crisis. Though all such crises have similarities (rotting pipes, difficult access, locating a willing plumber), they each have unique aspects as well. Here’s one Bungalow Club member’s story.
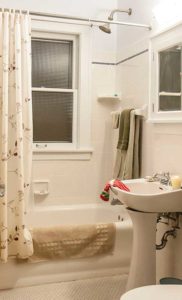
 I live in a 1921 bungalow in south Minneapolis with the typical floor plan: two bedrooms on the main floor separated by a bathroom. The bathroom originally had just a bathtub, but a previous owner had added a shower, of sorts, by installing one of those circular curtain poles above the tub. I later hired a plumber to remove the pole and install a new showerhead on the wall above the faucet, and had the walls around the tub finished with four-inch-square white tiles.
All was good until a couple of months ago when I noticed water dripping from the tub faucet. I didn’t think much about it until it began dripping constantly, leaking gallons of water each day.
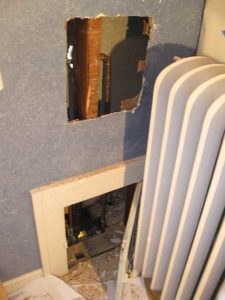
I called a handyman, Kent, who came to my house and examined the situation. On the opposite side of the shower wall, in my bedroom, is an original access panel for the tub’s plumbing. It’s situated near the floor and doesn’t offer access to the higher shower assembly. It didn’t take long for Kent to determine that the shower and tub plumbing was corroded and needed replacing. We made an appointment for him to return a week later to tackle the repairs. In the meantime, at Kent’s direction, I went to Menard’s and bought a chrome valve and handle, as well as an eight-inch-wide pan style showerhead.
For the entire week, the water kept running from the tub faucet. Because there was no water shutoff for just the tub, each night before bedtime I descended to the basement and shut off water to the entire house at the main meter.
A week later, Kent returned on time at 8 a.m.—a good sign! What could go wrong? We shut off the water and drained the house from the top to bottom, opening faucets in the bathroom, kitchen, and washtubs. Kent organized his tools, including a bucket of water.
As is typical for old-house plumbing projects, we hit a few snags.
Problem No. 1

The original access for the tub was too low to work on shower plumbing, so another was cut higher in the wall.
Upon opening the valve package I had purchased at Menard’s, we discovered that the temperature controller stem cartridge for the central valve was missing. Apparently, someone had pilfered it and I, an unsuspecting customer, purchased a package with a missing part.
While Kent began cutting a new hole in the lath and plaster higher up on my bedroom wall, I drove back to Menard’s, found a clerk and explained my dilemma. There were no more packages of my model so he gave me the “guts” of a valve controller from another model. I rushed home.
Problem No. 2
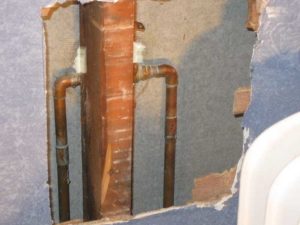
After cutting the new hole in my bedroom wall we discovered a 2×4 stud dead center in the opening, blocking access to the plumbing that ran from the tub to the showerhead. Apparently, the shower plumbing had been installed from the bathroom side and then enclosed with drywall and tile. The stud was not load bearing, and Kent could have sawed it out and inserted a new header, but he decided to work around it. He got to work and de-soldered or cut the existing plumbing connections, wetting the stud as necessary so that it wouldn’t burst into flame when the soldering torch was used next to it. The bucket of water was handy for dunking red-hot metal parts.

The shower plumbing had been installed from the opposite side of the wall. From this side, a stud made repairs challenging.
While he was in the wall, Kent installed new hot and cold water shut-off valves so that they are accessible through the access panel near the floor. If there are future plumbing problems, we can shut off the water at the source instead of draining the entire house.
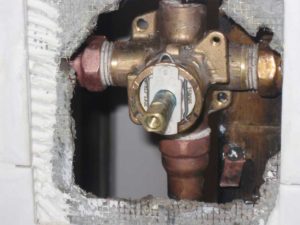
Kent explained that connecting the various copper pieces to the valve body is like a puzzle. He counted 19 separate pieces, consisting of connectors and elbows in different shapes and lengths. One by one, all were successfully connected to the valve body. He turned on the water and found one pinhole-size leak in the copper. He cut out that joint and installed a new one; you cannot reuse soldered pieces.
Up above, where the old copper pipe connected to a brass arm that extended through the wall and over the tub to hold the showerhead, the two metals had welded themselves together over time. Forcing them apart to attach the new showerhead extension might have snapped the hard-to-reach copper pipe, or damaged the tiles of the shower surround, or both. We decided to leave it alone and just screwed the new showerhead onto the old extension.
Problem No. 3
When Kent tried to attach the new handle to the new valve, it didn’t fit. It was also missing its decorative cap. I headed back to Menard’s, where the same plumbing clerk determined that not only were parts missing from the box I had purchased originally, the handle that was inside was not the correct one for the unit. There were no more boxes of my set in that store, so I headed to another Menard’s in Burnsville. Arriving back home, Kent installed the correct handle and adjusted the water temperature with the valve stem.
In all, Kent spent seven hours at my house without a break. We left the hole in the bedroom wall; later this summer I will have my painter repair it before he repaints the bedroom.
Things I Learned
- If a hardware package (especially one with multiple parts) looks like it has been opened, ask a clerk to inspect it to be sure all materials are included before you purchase it.
- If your basement ceiling isn’t finished, cover any furniture down there. When you open a wall upstairs, debris will fall down through the shaft.
- When using a soldering torch near wood, thoroughly wet the wood first and have a bucket of water ready in case a flame is sparked.
- The smell of smoke lingers for days after soldering. Have your favorite air freshener handy.


